In each of these screenshots, you're seeing just a single B-Bone - no hidden stuff, no tricks. Just a single B-Bone...
UPDATE: It's now in master! (After a little fight with git to let me merge the branch successfully...) Woohoo!
The Last Minute Bug Fix
As you may recall from last time, one of the main blocking points from the earlier test was that existing rigs were exploding.... and particularly those used in BlenRig (i.e. the current rig of choice for the Blender Institute Open Movie characters!). After my last post, I tried to search for solutions for this problem several times, but to no avail. Then, I got busy, and the project ended up shelved until I could get some more time to come back and look into it all again.
That is, up until last week. Just when I had been right about to give up on this (since it was clear that a lot more work would be needed to hunt and fix the bug, and that that was careful work + time that I didn't really have), I suddenly noticed some subtle changes that turned out to make all the difference! All of a sudden, the bug was gone, and the patch worked! Hoorah!
(Dev tip: If you ever find a situation like this, check and double check each line of the initial diffs for the patch carefully. Perhaps, buried in there somewhere will be a clue to the critical change which changed everything)
A Deeper Understanding of How B-Bones Work
Over the past few days, I've finally gotten a much deeper understanding of how the B-Bones calculations work, and in the process, have found that it's actually incredibly easy to figure out extension points for this once you understand all the moving parts, and how they come together. So, before I forget all about this (and the knowledge again gets lost to time), I'm going to try and document as much of this as I have the patience to do now :)
EDIT: I've ended up pulling this out into its own post.
Key Highlights Since My Last Update
* It all works now! - That was a MAJOR focus of the past few days - fixing the bugs in the implementation, cleaning up the code (to remove gunk, leftover experiments, simplify calculations, polish UI labels/tooltips, etc.), and checking that it plays well with all the various posing tools in Blender
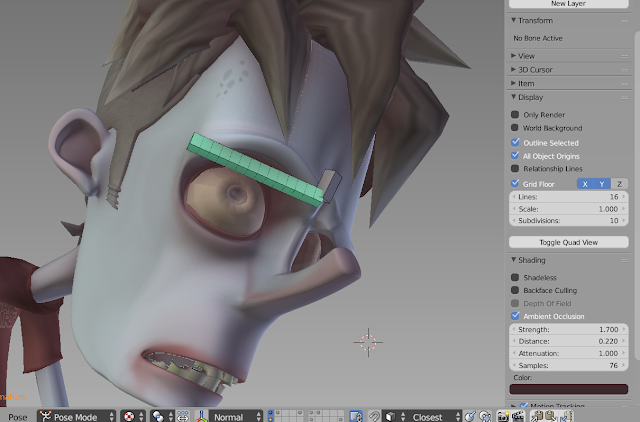
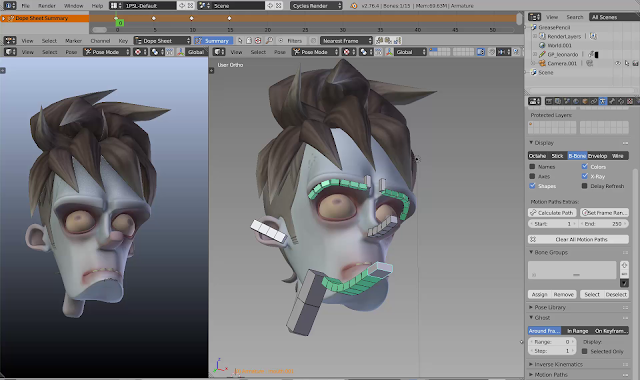
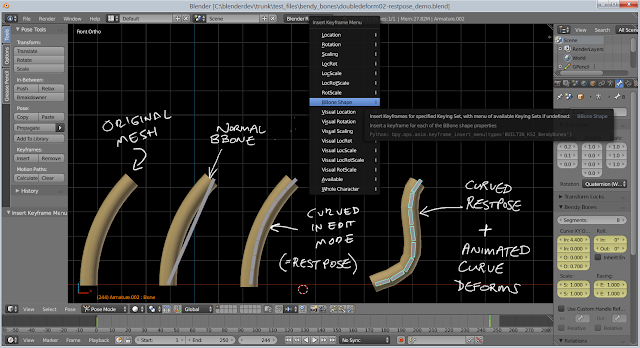
* B-Bones can be curved in their restpose shape - You can now edit the shape of a B-Bone in EditMode to define to restpose shape of that bone. This is useful when you've got things like curved eyebrows or mouths, where the restpose shape is curved. For example, it's useful in cases like this:
Before: A curved rest pose for this B-Bone would be useful... (Character by Abel Tebar)
After: The eyebrows now have a curved rest pose - There's just a single bone here for each eyebrow. (Character by Abel Tebar)
And here's a more abstract example if you want to see it all again:
With this ability, you can now do with a single B-Bone what may have required 2-3 previously (as you couldn't make the B-Bone go around the corner).
* New Keying Set for keying these properties - Since there are so many of these, it's useful to be able to key all of them in one go. As seen in the screenshot above, the "BBone Shape" Keying Set does exactly that!
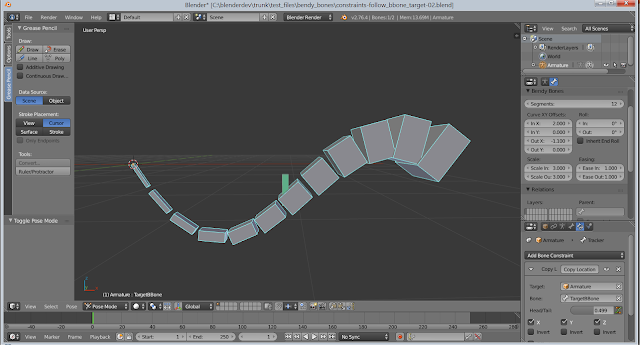
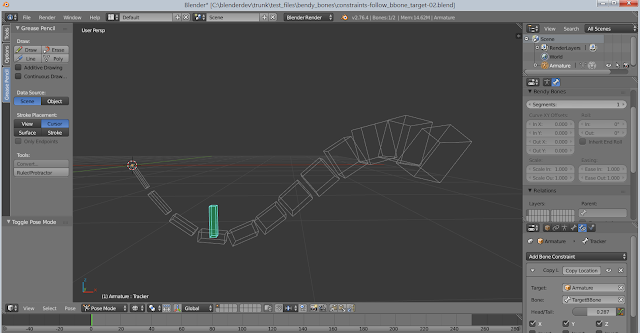
* Head/Tail Option for Constraints can follow the B-Bone shape, instead of just interpolating along the bone axis in a straight line
This useful option provides a lot more flexibility for constraints on rigs with B-Bones (e.g. maybe for secondary facial controls sitting on the surface of a bed of B-Bones?), and could potentially reduce the need for complicated multi-bone setups to do the same thing.
At Head/Tail = 0.25
See how the constrained bone actually sits inside the curved bone shape...
At Head/Tail = 0.49
Note how the B-Bone can have a varying range of thicknesses, going from thin to thick, while curving at the same time
* Bendy Bone settings are now in their own panel. As these will hopefully get used as a common posing tool, it no longer makes sense to have these locked away in the "Deform" panel of all things! Besides, as the Constraints change shows, the bone need not be a deformation bone to have some curvyness going on!
* Use Custom Bones as Reference Handles - As anyone who's used classic B-Bones in Blender knows, B-Bones try to use the next/prev bones to act as the "handles" for the B-Bone splines. This however can get problematic in several ways:
1) When just trying to move the bone chain around, without having it start distorting
2) When you've got a long chain of B-Bones, and the parent bones may rotate to adjust the position of all the bones, but you don't want that also causing some rolling/rotation to get passed down the chain.
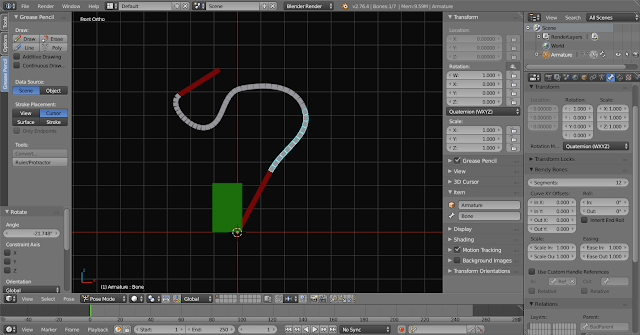
Before: Selected B-Bone is affected by the position/alignment of its parent (red) relative to it. Also, if its child rotates, the bone will also change shape in that case. But, remember, if both bones are B-Bones, this sort of thing goes both ways! This leads to an interesting problem: now that we have the Bendy Bone properties, this could also end up being problematic, if rotating a bone suddenly breaks the carefully fine-tuned BendyBone pose in 2 B-Bones as a result!
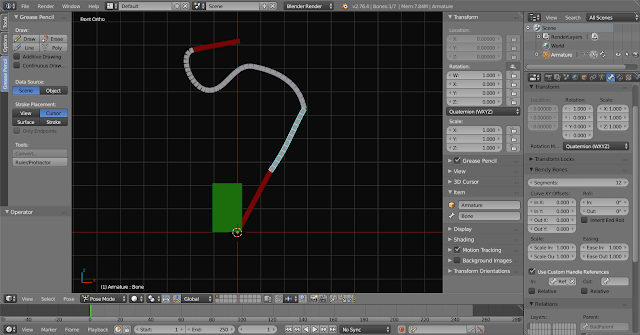
After: With the "Use Custom Handle References" option enabled, Blender doesn't try to use the parent/child bones automatically.
-> In fact, by default, it will choose to do nothing if both In/Out bones are left empty (i.e. the only bendiness you'll see is from the transforms you dial in using the properties
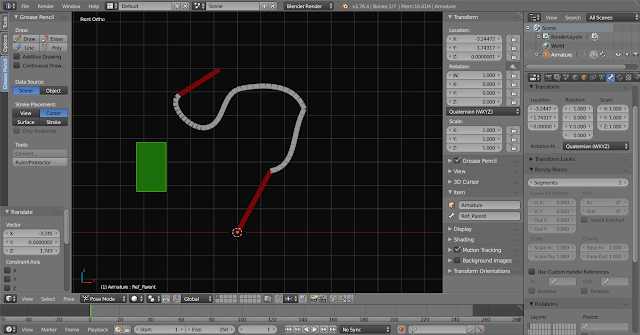
-> Here, the "In" field is using the green/boxy bone as it's parent. That means that it will use the location of that bone as its parent. (The green bone is NOT related to the bone in any other way though, so it won't be subject to the same distortions that may have required a lot of counter-rigging before)
After - An example of what happens when the green bone starts getting moved around (the origin was at the cursor)
Now, just in case the custom control bone happens to be far away from its target (thus affecting how the handle functions), there's also a "Use Relative" option. What that does is it computes how far the reference bone has moved away from its restpose position, then applies that delta to the appropriate endpoint of the bbone to use as the handle. That way, the only thing you have to worry about is how far has the reference bone moved from its restpose!
So, when/where can we try this?
I'm planning to merge this stuff into master within the next day or so. I'd originally planned on doing it today, but writing up all this stuff, and making all the screenshots/diagrams has ended up taking a lot more time than I'd expected! But, it looks like both Daniel (pepeland) and JP Bouza are currently happy with the way things are working, so we should be able to see this in master very soon.
If you're really curious, you can also just try the current code here:
Be warned that this is based on an old 2.76-master base from about December/January. I haven't updated that tree on my machine yet, since it still has a lovely working "scons + mingw" build environment (which got obliterated not too long afterwards in favour of cmake, which in turn meant only msvc was left as a viable option :( Gah!) Working with this setup again these past few days after dealing with cmake + msvc for the past few months has been a breath of fresh air! It's just so nice being able to use a fast, reliable, and not-annoying build system again! It's just a pity I can't get something similar set up for master/upstream dev anymore :'( *sobs*
On a more upbeat note: I LOVE doing stuff like this - bashing away at a system, exploring what happens as you tack on additional capabilities, and seeing what doors these new additions open up in the tool! We're all so lucky that Blender exists, and that I get to hack around with stuff like this :D Especially when going through a patch of doing dull/not-so-nice academic work, spending a few days just having fun again, doing what I love most is always a wonderful prize.


thank u
ReplyDeleteoh that's so great!
ReplyDeleteThank you!
ReplyDeleteThe new Bendy Bones look great.
ReplyDeleteAnd if it helps, you may be able to use cmake + mingw http://stackoverflow.com/questions/4101456/running-cmake-on-windows
thank you!
ReplyDeleteThis comment has been removed by the author.
ReplyDeleteAbsolutely fantastic to see this. I had no idea B-Bones were about to be improved this fast after watching Daniel's (Pepeland) presentation at BConf2015. I always thought B-Bones were one of those unique underutilized Blender features. Now it got a deserved attention! Rigging in Blender is getting so much easier and better! Congratulations!
ReplyDeletegenious!
ReplyDeleteI came here to say: Keep up the good work!
ReplyDeleteHi !
ReplyDeleteWould be good to see -vimeo?- how to add this to a standard with IK/fk tips rig. And after, at the end about all the rig, see how to make this work as a squash/stretch.
Ty !
how do i install the b bone plugin to blender? i try installing the zip file in addons but it isnt showing in the addon list.
ReplyDeleteHi,
DeleteThis is NOT a plugin, but built into Blender itself. So, you'll need one of the latest development builds from https://builder.blender.org/download/
Awesome! I' ve been wanting this functionality for ages! May I ask, is it also possible to parent individual bones to B bone segments? With the ability to inherit loc/rot/scale? (and toggle each ability on or off?) I made several rigs with bendy bones, but usually want to actually just use boxes as a last, LAST layer. so I can pose a character normally, then go to my "cube bones" layer and move boxes around to tweak stuff. I' ve always had to hack my way around this to get boxes to follow " bendy" motion. (by using bones with copytransform constraints at 50% and such. Being able to just parent (maybe even snap?!) whole bones to Bbone segments would be awesome!
ReplyDeleteThis may be possible via the constraints. I currently made them only use location of the segment while retaining the bone's transform, but it's not too hard to make them inherit both. The question is whether doing so will break any rigs, and/or whether it is useful. From your response though, it sounds like doing so would be useful :)
DeleteHow i can install this addon in to Blender??? please help me!!!
ReplyDeleteHow did you make so the end of the bone snaps to a another bone and you can move around the other bone freely, like what you did with the jaw and hair?
ReplyDeleteWill be Bendy Bones in 2.8? Its a excellent tool, the difference.
ReplyDelete