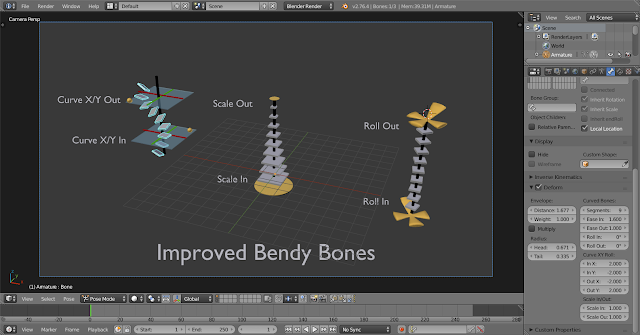
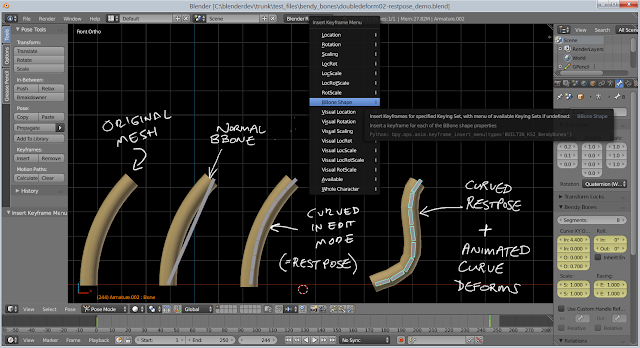
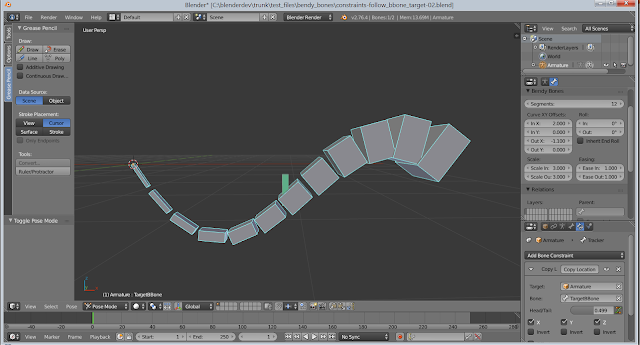
BTW, all the diagrams within were done using Grease Pencil :)
The Magic Function
It turns out that all the magic for B-Bones lies in a single place: b_bone_spline_setup() in armature.c
This function is responsible for calculating the 4x4 transform matrix for each segment in the B-Bone. It takes 3 arguments:
* pchan - The B-Bone that we're calculating the segments for
* rest - Whether we're calculating the "rest pose" of the bone or not (more on this in a moment)
* result_array - The array where we're going to write the transform matrices (one per segment)
Most of the time, the function gets called like this (pseudo-code for the loop):
for (pchan in bones) {
Mat4 bbone[MAX_BBONE_SUBDIV];
b_bone_spline_setup(pchan, 0, bbone);
/* ...do something with the bbone data... */
}
Several things to note about this code:
1) The bbone segments usually get allocated on the stack, and we just create the maximum sized array.
- Stack allocation since these results are usually just throwaway (i.e. it's only calculated when it's needed, but not stored between calls to this).
- We just use the maximum array size since it simplifies things, but also because the bezier routines in Blender (that are used for everything Bezier related, from 3D curves to F-Curves to B-Bones) can support at most 32 subdivisions between each pair of control points. This is why the Segments property is limited to 32 segments
2) The "rest" parameter is set to 0. In general, most of the time when working with BBones, you want to pass zero for this parameter, as you want to see the B-Bone with all the deforms (e.g. for visualising in the viewport, for constraints, or as part of calculating the final transforms).
However, it's important to note that we can sometimes have rest == 1. As I discovered (when I finally figured out why the BlenRig rigs had been exploding), it is very important that we pay attention to this case, which gets called twice in Blender (once by the armature modifier when deforming geometry, and another when automatic weights are being calculated).
The "rest" parameter basically says whether we're calculating the restpose shape of the BBone, or whether we're computing the final deformed shape of the BBone.
Bug - No restpose cancelling of BBone deforms == "Double Transform"
It is necessary to calculate the restpose of the bbone (and not simply use something dervied from the bone vector itself), as it allows us to do fancy stuff like "cancelling out" the contribution of the editmode shaping of the BBone from the final deform; if we don't do this, you'd end up with points getting "double transformed" by the BBone (i.e. because we reshaped the BBone in editmode to match the geometry more, the BBone would deform the curved mesh further if we didn't cancel out this restpose deform first). In other words, the final deform applied to the mesh is the difference between the restpose and deformed states of each segment.
3) All these transforms are in "bone space". That is, all of these segments are calculated relative to the head and tail of the bone, and cannot just be used standalone. Instead, you need to multiply these by the bone's "pose matrix" (i.e. pchan->pose_mat) to get these in pose space, if you want to be able to make another bone follow the shape of the B-Bone - that's how the new "Follow B-Bone Shape" option for the Head/Tail target locations for Constraints works.
How B-Bones Work
So, how exactly do B-Bones work?
We treat the bone as a section of a Bezier curve - in much the same way we'd treat a section of a F-Curve between two keyframes.
* Each "B-Bone segment" of the bone represents a tesselated point of the Bezier curve.
* The control points at each end of the curve are the endpoints of the bone.
(pose_head = v1, pose_tail = v4)
* We construct handles on either end of the bone to control its curvature
(h1 = v2, h2 = v3)
* We also compute a "roll" value (or twisting around the main - y - axis of the bone), and do so per-segment, by interpolating between the start and end roll values
(roll1 = start roll, roll 2 = end roll)
* For each segment, we can also introduce some scaling effects to adjust the thickness of each segment (see notes on extension points)
The real magic to getting Bendy Bones here is in how we determine where those handles are relative to the control points, and how long they are.
* "Classic" B-Bones did this by using the endpoints of the next and previous (i.e. first child and parent) bones as the coordinates of the handle points (h1 and h2 respectively).
* "New" B-Bones apply offsets to these handle positions (Curve Offset X/Y) on the plane perpendicular to the bone's primary (y) axis, on top of whatever the "base" h1/h2 positions were. More on this later...
* "New" B-Bones also have the option to use specific (potentially unrelated) bones for the next/prev handles. More on this later too...
* And, if all else fails, we just use some "default" handles, which are in line with the bone along the y-axis...
h1 = (0, hlength1, 0)
h2 = (0, -hlength2, 0)
* Knowing the position of the handle vertex, we convert that to an orientation by normalising, and scale by the handle length. So,
h1_final = normalise(h1) * hlength1
h2_final = normalise(h2) * hlength2
* The length of each handle (hlength1 and hlength2 respectively) is based on the "Ease In/Out" properties, the length of the bone, and a magic-number factor ("0.5f * sqrt(2) * kappa", where kappa = the handle length - apparently this formula allows "for near-perfect circles"). i.e.,
hlength1 = ease_in * length * 0.390464f
hlength2 = ease_out * length * 0.390464f
...
Code Structure
Knowing the general idea of how B-Bones work, how do we translate those insights into features? How is it implemented, and what does that mean about how we can extend it?
First, here is a little diagram of all the main parts of the code. Note that this is before the new B-Bones features were added:
So, what do each of these parts do?
1) Irregular Scale - This tests if non-uniform scaling is being applied (i.e. one of the axes is fatter than the others). If so, some scaling corrections will need to be applied to the bone length (and again later - in step 8).
NOTE: Be careful about the checks here. I ran into a bug where the new B-Bones (just the offsets, no traditional bone-handles were involved) were flattening out when the bone was being scaled up by about 8.15 - 8.16. It turns out that due to floating point precision errors (it checks for 1 ^ -6 differences between values), it was occasionally tagging the bone as having non-uniform scaling when it passed through that range, causing the bone length to go from ~1 to > 8. As a result, the new B-Bone offsets were overpowered, causing the bone curve to flatten out!
2) Handle Lengths - This just calculates the length of each handle (hlength1, hlength2) from the bone length and the Ease In/Out settings
3) Get Handle Bones - This tries to get the next (child) and previous (parent) bones to act as handles for the B-Bone. If the parent is not connected to the bone, it isn't used.
4) Compute Handle Verts for h1 - This computes the coordinates of h1 (the starting handle). The logic here works something like this:
if prev != null:5) Compute Handle Verts for h2 - Just like step 4, except this works on h2, and uses the tail of the next bone. It also tries to do a bit more "stuff"
# Use previous bone as handle 1
h1 = convert_to_bbone's_local_space(prev.pose_head)
h1 = normalise(h1) * hlength1
if prev.segments == 1: # control bone, not bbone
roll1 = interpolate_prev_roll(prev)
else:
roll1 = 0
else:
# Use dummy, bone-aligned handle
h1 = (0, hlength1, 0)
roll1 = 0
if next != null:
# Use next bone as handle 2
h2 = convert_to_bbone's_local_space(next.pose_tail)
if next.segments == 1: # control bone, not bbone
h2.y = -length
h2 = normalise(h2)
roll2 = interpolate_next_roll(next)
h2 *= hlength2 # only negate the handle now...
else:
# Use dummy, bone-aligned handle
h2 = (0, -hlength2, 0)
roll2 = 0
7) Bezier Calculations - This is the step where the bone vertices (pose_head, pose_tail), handles (h1, h2), and roll values (roll1, roll2) get evaluated as a Bezier curve. It is done per-axis - treating each one as a Bezier curve itself, before the roll is also calculated in a similar manner. The result of this step is that we get an array of 4-item tuples (x,y,z + roll) - represented as a flat array - that has the coordinates we need for the next step...
8) Compute Per-Segment Transforms - Here's where we wrap things up, converting the point + roll tuples (8a) from the Bezier curve evaluation into the 4x4 transform matrices needed (8b) by everyone else. Then, if irregular scaling was detected (in step 1), scaling corrections need to be applied to this matrix... The resultant 4x4 transform matrices are stored in result_array.
Implementing New Features - Extension Points, and How the New B-Bones Work
Now, let's see that diagram again, with all the new parts added (highlighted):
The following steps were added/modified for the following reasons:
* 6, 8d - (Added) - These steps are where the Bendy Bone magic happens! See next section for details about what and why.
* 3 - The "Use Custom BBone Reference" option is implemented here. It's probably quite simple to see how this can be implemented: When the option is on, just use the specified bones instead of using trying looking at the bone's neighbours.
* 4, 5) - The "Use Relative" options for Custom BBone references are implemented here. This is because instead of using the endpoints of the bones as absolute points in 3D space which we then map into the bone's space to use as its handles, we instead take a look at where the reference bones are relative to their restpose - this delta transform is then applied as to the bone's own endpoints to get the handle locations.
How the New Bendy Bone Options Work
As a reminder, here are the new controls that have been added for B-Bones, with annotations showing how they work:

Here's how those properties are mapped to the B-Bone evaluation method:
* Affect's Bezier Curve Calculations => Applied in Step 6 as offsets to these values...
- Roll In/Out --> roll1, roll2
- Curve X/Y In --> h1
- Curve X/Y Out --> h2
So, the Roll values are basically rotational offsets applied on to of the rotation stuff that already has to happen.
The Curve X/Y values work by skewing the pushing the handles further out on the plane perpendicular to the main axis (y). As a result, the handle moves further from its original location, causing the curve to bend.
* Affect's B-Bone Segments (but doesn't impact the curve calcs) => Applied in 8d over the top of whatever else is already there...
- Scale In/Out --> Scale In and Scale Out are combined together to get a "combined scale factor" (for X and Z axes only, to affect the segment thickness but not its length). The influence of each factor is made to fade out over the length of the bone chain, going from each end to the other. Then, this scaling transform gets premultiplied with the existing transform matrix to get the final result.
The "Rest Pose" for Curved Bones
Sometimes, it's useful to be able to have the B-Bone start off curved. For example, if you have a model with some curved facial features you wish to deform using B-Bones, if the B-Bones could only only be straight lines (as previously) the weighting wouldn't be so great (as the B-Bone didn't match the geometry). Instead, you'd end up having to add a whole lot more bones to compensate!
Motivation for Curved B-Bone Rest Poses - Character by Abel Tebar
By having the ability to define some initial curvature for B-Bones (i.e. for the restpose of the bones, in editmode), this problem could be solved! That's what we've done here.... Implementing it was simply a matter of having two sets of the Bendy Bone properties - one for Bone/EditBone (i.e. the RestPose/Base Rig) and another for PoseBone (i.e. what animators work with) - and adding together their values to get the final transforms.
The only complication is that we need to account for the restpose shape when computing the necessary deforms, or else we get a "double transform" effect (see notes above regarding the "rest" parameter to b_bone_spline_setup())
Other Assorted Notes
* Constraints Head/Tail option follows curvature of B-Bones - There are times when it's useful to allow constrained bones to follow the shape of B-Bones, without having to set up an additional complex system of additional bones to do the same thing.
It turns out that implementing this is quite simple in fact! You just need to call b_bone_spline_setup(pchan, 0, bbone_segments); then you have the segments that you can perform some interpolation with to get the final transform. And so far, performance doesn't really seem to be bad enough that we'd want to cache these off instead...
* Edit Mode preview of B-Bone curvature shape - Previously, there was no real B-Bone preview in EditMode. You could see that a B-Bone had a certain number of segments, but that was it. And really, it was sufficient, as in EditMode, the bones by definition are all in the rest poses, so there really should not be any bending going on with the "Classic" handles.
However, if we want to have curved restposes for B-Bones, we also need a way to see how they look. I ended up having to create a copy of b_bone_spline_setup() - ebone_spline_preview() in drawarmature.c - that is used for this purpose. It only calculates the Bendy Bone effects (since the others don't make sense), and it does so using EditBones (as PoseBones and Bones don't exist; it would have been messier to have tried to make a hacky adapter to get an EditBone looking enough like a PoseBone + Bone combo to get this working using the standard method)
* Deformation Quality - I'm really not much interested/skilled in deformation quality (or rendering or mocap for that matter) work. Instead, I mostly focus on issues of control schemes, interaction methods, tools, and animation system cores. As such, any questions regarding the quality of B-Bone deforms, or how those work are not covered here.
For details about those, go consult the armature modifier for further details about how it uses the B-Bone info gained from b_bone_spline_setup(). My guess is that it calculates delta matrices for each segment, and then interpolates between these to deform points that are affected by such bones. Smoother deforms may be possible if we added an extra smoothing step in there somewhere, instead of just using the result.


I love the grease pencil whiteboard annotations, that really works well for communicating the thoughts in a class room like way.
ReplyDeleteLook at this Video demostration,it would be cool if you can do something like this in Blender Grease Pencil!!!!
ReplyDeletehttps://www.autodeskresearch.com/projects/skuid
https://www.youtube.com/watch?v=mqQO-IoG4qw
ReplyDelete